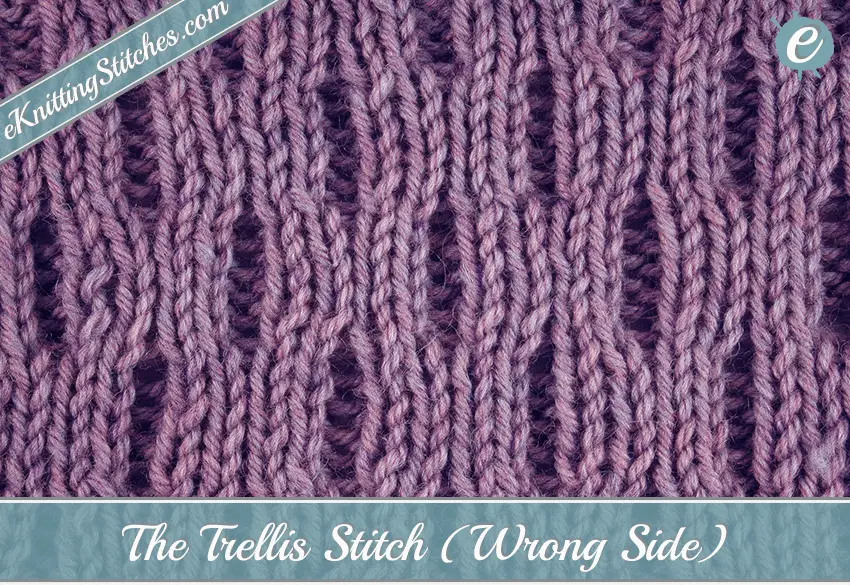
The Trellis Stitch is a member of the Cables & Twist Stitch family and produces a interlocking chain-mail affect.
The stitch gives a very angular honeycomb type texture and is an excellent choice for paneling on large projects.
The cross-over link effect is created by knitting what is in effect a rib style stitch, then slipping stitches onto a cable needle on the fifth and eleventh rows of the pattern repeat.
By varying the timing of these cable rows you can make for a tighter interlocked pattern by repeating them more frequently, or alternatively generate a rib pattern with an occasional switch by increasing the cable row numbers.
Looking to get started, well lets move on to the instructions…
Instructions
Cast on any multiple of six stitches for your project.
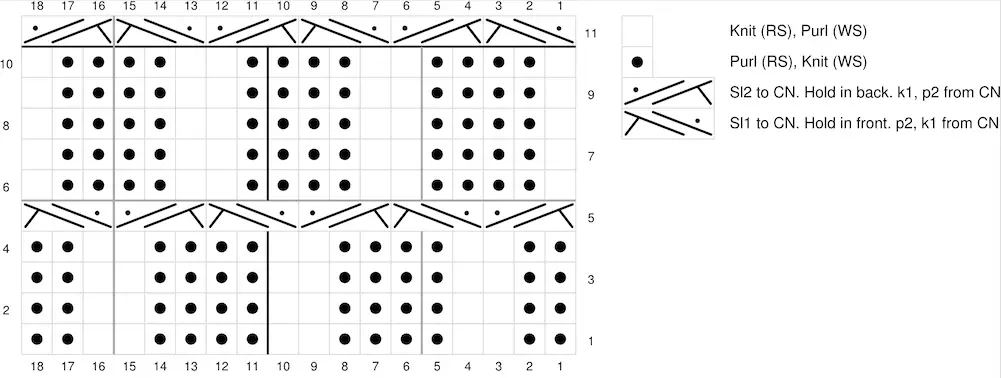
The first row consists of a six stitch repeat of purling two, then knitting two, then purling two.
For the second row (and all wrong side rows), we want to knit all the purl stitches and purl all the knit stitches, so in our six stitch from the first row start by knitting two, then purling two and then knitting two again. For row three, repeat the first row.
The fifth row is where you need to cable needle at the ready. Ready? Slip two stitches onto the cable needle and hold it at the back of the work then knit one from your left-hand needle. Now, purl the two stitches that are on your cable needle. Slip another stitch from your working needle onto your cable needle and hold it at the front of your work. Purl two stitches from your left-hand needle and then knit the stitch from your cable needle.
Row six, continue knitting the purl stitches and purling the knit stitches.
The seventh row consists of the six stitch repeat of knitting one, then purling four then knitting one. Continue with knitting purls and purling knits on the alternate side. Then repeat these two rows again for rows nine and ten.
For the eleventh (and last row in the pattern repeat), start by slipping one stitch onto your cable needle and hold to the front of the work. Then you will purl two stitches from your left-hand cable followed by knitting the stitch from your cable needle. Next slip two stitches from your left-hand needle onto your cable needle, and then knit one from you working needle, followed by purling two from your cable needle.
Once you have completed row eleven, continue repeating rows 1-11 until you have the desired size.
Traditional Instructions
Rows 1 & 3: *p2, k2, p2; repeat from * till the end of the row.
Rows 2 & 4: *k2, p2, k2; repeat from * till the end of the row.
Row 5: *C2B, k1, p2 from cable, C1F, p2, k1 from cable; repeat from * till the end of the row.
Rows 6, 8 & 10: *p1, k4, p1; repeat from * till the end of the row.
Rows 7 & 9: *k1, p4, k1; repeat from * till the end of the row.
Row 11: *C1F, p2, k1 from cable, C2B, k1, p2 from cable; repeat from * till the end of the row.
Repeat rows 1-11 to desired length.
Trellis Stitch Chart

Trellis Stitch Swatch Examples

